BREAKING NEWS
Showing posts with label android. Show all posts

22 April 2016

Google presents the annual safety report in Android


 The second consecutive year, Google has launched the annual safety report in AndroidThe paper analysis protection tools services company, review the security measures introduced in 2015 and provide information about the work on the protection of the Android community. 
One of the points in which the company last year was on improving its service focused protect Android users. To detect malware and malicious apps, as well as to protect users from Network - based threats, the Mountain View checks carried out Everyday in more than 6,000 applications and 400 million devices. 

Less harmful apps in Google Play


Thanks to these efforts, the chances of installation of a potentially malicious app (PHA for its acronym in English) from Google Play decreased more than 40% compared to 2014. The records main categories of malicious applications that have been reduced are the data collection, spyware, and hostile discharge system. 
Terminals installed apps both the official store Google and other sources have recorded levels similar to those of 2014. However, PHA from Mountain View emphasizes that their service Verify Apps, a protective tool for users who install applications outside of Google Play, is 50% more effective than the previous year.

Security Enhancements Android 6.0 Marshmallow
Google's report also reflects the importance of security enhancements of Android 6.0 Marshmallow to maintain the protected ecosystem. These include measures such as full disk encryption for most devices, now also extended to encrypt data on the SD card.
Moreover, the updating of permits optimizes review of data that are shared with apps. Also, the boot ensures checked the condition of the phone l will patch security levels allow check if a terminal has all the security updates, among other improvements. 
With this document, Google aims to provide clear information to users to foster dialogue to get the Android ecosystem as safe as possible. If you want to see the annual report 2015 full Android security, you can do it from this link. 

18 April 2016

How to receive Android notifications on your PC with Google Chrome and pushline


Increasingly more we tend to have all our connected together so that we can easily interact with all devices. One of the aspects that seek to synchronize between them are notifications so that if, for example, are using the PC and receive a message on the mobile we know what it is without having to take the device. There are several application that allows us to synchronize our Android smartphone notifications on our PC, but one of the most complete is pushline .
Pushline is a platform made up of two parts, on the one hand, a free extension for Google Chrome and other an Android app so that, once matching two, will allow us to receive notifications from your smartphone on your computer through the extension installed in Google Chrome.
The main functions and features of this application are:
  • It allows us to receive and interact with notifications of our Android from the PC.
    • Accept or reject calls.
    • Adjust the volume.
    • Locate the smartphone, even if it is silent.
    • Synchronize contacts with your PC.
    • Make calls.
    • Reply to SMS.
  • Notifications are encrypted before being sent to the computer, so they travel over the network secure.
  • Can send notes, text and other content in both directions (from PC to smartphone and vice versa).
  • Synchronize PC clipboard and Android.
  • Very low traffic and resources consumption.
  • It is free and free of advertising.
A first thing to do is download and install the extension in your browser.

We must also download and install the application pushline on our smartphone from the application store Google, the Play Store.
Developer: Nutcore
Price: Free 

How to configure and use pushline on Android and Google Chrome


Once you have installed both our PC and our smartphone Android, application the next step is to match the two applications . To do this, we will open the applications on Android and see how it appears a temporary code. 

If we open the extension of our Google Chrome we will see how a button appears at the bottom to pair it with our smartphone. We click on it and enter the key that we appear in Android.

After a few seconds we can see how the connection is successful, we displayed a notice of proof and light at the top right has become green, indicating that pairing has been completed successfully and no connection between Android and PC.

For our part we have to do more because, from now on, whenever you receive a notice we receive on our computer, however, as we have shown before, this tool has many additional features as we will see then. 
 
The first is the ability to send notes from a PC to your smartphone, for example, send links or text you want. To do this, open the side menu of the Chrome extension and select " Send a Note ".


We write the text you want and, in seconds, see how it appears in Android notification with the text. 
One drawback to the application we can emphasize that, if we mark a notice as read on Android, this does not disappear from our PC, nor vice versa. We must discard notifications manually both Android and the Google Chrome extension. You may later add this feature but for now, can not be.
another pushline functions is the ability to use the tool to make calls or answer incoming calls, but the audio will always be through the smartphone. It will also allow to synchronize your calendar to check any number from the search box.
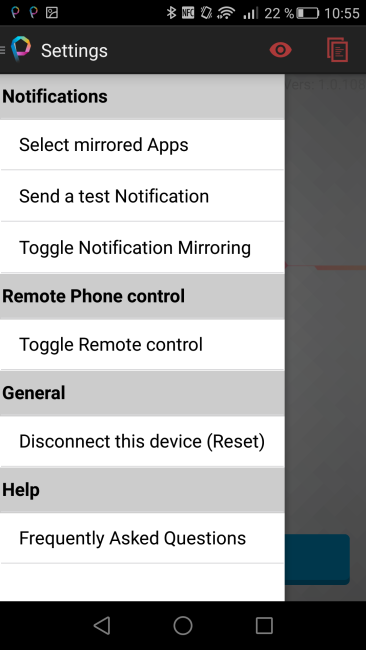
From the Android application we can also configure some aspects of the application, for example, making only notifications of some specific applications are sent, send notifications test to verify that everything is working properly or activate the " private mode " to disable temporarily sending these to the PC.

As we can see, pushline is an excellent alternative to sending notifications have our Android to your PC, especially after the change of business plans Pushbullet to turn most of their payment functions.

17 April 2016

Samsung Galaxy A9 Pro (2016)

Samsung Galaxy A9 Pro (2016)
The Samsung Galaxy Pro A9 (2016) is the renewal of the phablet's top of the range Samsung Galaxy A. The company chooses the format of the six - inch screen with full HD resolution. As for the design, we found no developments in this regard since the South Korean firm maintains the angular lines and slim casing. Of course, the model in question on the back cover is glass reinforced and not metal.


Regarding features and performance, the Samsung Galaxy Pro A9 (2016) is placed on top of the average range of Asian manufacturer. The screen, as indicated, is represented by a panel HD Super AMOLED six inches and FullHD resolution. This information yields a density of 367 dots per inch.
Inside the highlight is provided by the processor and memory. In the first case, the Galaxy A9 Pro (2016) Qualcomm Snapdragon SoC appreciate eight core 652 and a maximum frequency of 1.8GHz. In turn, the processor includes a graphics accelerator Adreno 510. As regards the memory, the phablet has the not inconsiderable amount of 4 GB of RAM, more than enough to move with absolute ease the operating system based on Android 6.0.1 Marshmallow and Samsung TouchWiz GUI. As for the system of internal storage, the device offers 32 GB, plus the ability to add microSD cards up to 128GB in the slot adapted to, in turn, the Nano sim the Dual SIM card version.
The primary camera of the Samsung Galaxy Pro A9 (2016) consists of a 16-megapixel sensor whose great feature is the introduction of a system of optical image stabilization. Similarly, optics has an aperture value f / 1.9, the same as that offered by the secondary camera, the front, in this case with an eight-megapixel sensor. In any case, video recording is FullHD both.
Wireless connectivity Bay also good level because the support for 4G networks with LTE Advanced technology have to add the ac WiFi dual-band connection, ANT +, Bluetooth 4.1 and GPS assisted.
As for autonomy, the phablet has a large capacity battery with 5000 mAh for, which shows his level of durability. Also, the battery is fast charging.
 A9 Samsung Galaxy Pro (2016)
Launching
format
Bar
 Screen
Type
Super AMOLED
Size
6 inches
Resolution
1080 x 1920
Colors
24 bits (16,777,216 colors)
Touch
Capacitive multitouch
Density
294 ppi
 Camera
Photo resolution (main) mode
16 MP (3894 x 2988)
Video resolution (main) mode
Full HD1080p (1920 x 1080)
FPS maximum recording (main)
30
Resolution photo (secondary) mode
8MP (3280 x 2464)
Resolution video (secondary) mode
Full HD 1080p (1920 x 1080)
Maximum recording FPS (secondary)
30
Video Playback resolutions supported
HD1080p (1920 x 1080)
FPS maximum play
30
Type Zoom
Digital
Flash
LED
Image Stabilization
Yes
Video recording formats
3GP (3GPP), H.263 (MPEG4 Part-2), H.264 (MPEG4 Part-10), MP4 (MPEG4 Part-14)
Video playback formats
3GP (3GPP), H.263 (MPEG4 Part-2), H.264 (MPEG4 Part-10), MKV (Matroska), MP4 (MPEG4 Part-14)
Extras
AF / phase detection / Aperture f / 1.9 for front and rear camera
 /  Connectivity / Storage
USB
microUSB
Bluetooth
4.1 with A2DP
WiFi
802.11a (5GHz), 802.11b (2.4 GHz), 802.11g (2.4 GHz), 802.11n (2.4GHz), 802.11n (5GHz), 802.11ac (5GHz)
Headphones
3.5 mm
Internal storage
32GB
External Storage
microSDHC (SD 2.0) (128GB)
RAM
4GB
 /  Multimedia / Internet
Email
IMAP, POP3, SMTP
Speech Recognition
Android
FM Radio
Tuner, Support RDS
Music Playback Formats
AAC, AAC +, AMR / AMR-NB, FLAC, MIDI, MP3, OGG (Vorbis), WAV, WMA
 /  System / Autonomy
OS
Android 6.0 Marshmallow
Manufacturer interface
Samsung TouchWiz
Sensors
Fingerprint, Accelerometer, Gyroscope, Proximity, Compass, Ambient Light
Sports and health sensors
heartbeat
Core
Qualcomm Snapdragon 652 (8 cores)
Frequency
1800 MHz
Graphics core
Adreno 510
Geotagging
GPS, A-GPS, GLONASS
Battery
Li-Ion 5000mAh
quick charge
 extras
Protection
IPCorning Gorilla Glass 4
Selling applications
Google Play Store
Selling music, ringtones, and videos
Google Play Store
Bookselling
Google Play
Access to Social Networks
Installing Apps
Synchronization program
Samsung Kies
Extras
Noise Cancellation / ANT + / Color pearl white, black anthracite, gold and pink /
Payment system
Apple Pay
 Radio
2G
GSM 850, GSM 900, GSM 1800, GSM 1900
3G
HSPA 850 HSPA 900, 1900 HSPA, HSPA 2100
4G
LTE 800, LTE 1800, LTE 2100, LTE 2600
Radio Data
GPRS, EDGE, HSPA, HSPA +, LTE, LTE Advanced
Max. down (LTE)
300Mbps (Cat6)
Max. rise (LTE)
50Mbps (Cat3 / 4)
SIM
Nano SIM


07 April 2016

How to encrypt your iOS or Android device

The battle between Apple and the FBI has put us remember the importance of encryption (or encryption information). Whatever your opinion about it , you should not have to explain why worth protecting your personal data, and it all starts with your smart phone.
IPhones and Apple iPads and most devices Android can be encrypted, and this is what you need toknow to do it:


iOS

Apple introduced the encryption devices with iOS 8 in 2014. All that is needed to activate a security code or a fingerprint. While a four-digit password is enough, if you want to have better protection I recommend using a numerical access code or longer password.
  • Go to Settings (Settings)
  • Select Touch ID & Passcode (Touch ID & password), or passcode (password), in the case of older devices that do not have fingerprint reader
  • Click the option Turn Passcode On (enable password)
  • Enter an access code or password to be strong

Android

In the case of Android devices it is a bit more complicated. Nexus phones and tablets from Google come with standard encryption enabled. A majority of new devices that are being sold with Android 6.0 Marshmallow , such as the Samsung Galaxy S7 and the Galaxy S7 Edge , are also encrypted. Similar to what happens with the iPhone way, all you have to do is add a security code or your fingerprint to activate.
  • Go to Settings (Settings)
  • Click Security (protection)
  • Select Screen Lock (lock screen)
  • Create a security code
However, in the case of older ones, such as the devices Moto X Pure and Galaxy S6 , you'll need tomanually encrypt them Before starting, make sure your phone is connected to power and to complete the process could take up to an hour, depending on the amount of data stored on your device. Then create a security code using the method described above and follow these steps:
  • Go to Settings (Settings)
  • Select Security (security)
  • Click Encrypt phone (encrypted phone)

In the Galaxy S6 the method is slightly different. You have to go to Settings (Settings), select Lock Screen and Security (screen lock and protection), followed by Other Security Settings (other protection settings) and click Encrypt phone (encrypted phone).
You can also encrypt your SD card to keep your data safe and prevent the card from being used on another device (unless it is first deleted). Go to Settings (Settings) , select Security (protection) , followed by Encrypt external SD card (encrypt external SD card) and click Enable (activate). Unlike device encryption, which requires that you delete the phone to remove the SD card encryption can be easily reversed in the Settings menu (configuration).

Reasons not to encrypt your Android device

Encrypt your phone might seem obvious, but there are some reasons why you may want to do so. The method is slightly different on each device. Motorola, for example, lets you continue using a personal identification number (PIN) and a pattern after the phone has been encrypted, but Samsung only let you use an access code or fingerprint.
Samsung also required to enter a password each time you restart the phone. While this makes it difficult for thieves access to your data, it may be too inconvenient for some people.
In addition, the performance of your device also will be a little affected when encriptes. In recent high -end phones just noticed the change, but older or low - end models could I resent it . I recommend only encrypt recent high - end devices like the Galaxy S6, LG G4, HTC One M10, and newer versions of the same (Galaxy S7, LG G5 and others).

Beaming PlayStation games on your PC or Mac

It's happened to everyone. You want to play with your PlayStation 4, but someone else is using the TV. No need to make tantrum or start a fight. Sony has released an update for the PS4 that allows you to stream games directly to your PC or Mac. It is similar to the transmission function of the PlayStation Vita.
The Remote Play, or remote play feature should work with most laptops and desktops. It is compatible with computers running Windows 8.1 or newer versions and OS X Yosemite or newer versions. In addition, your computer should have at least 2GB of RAM, screen resolution of 1,024x768-pixel or higher, and at least one Core i5-520M 2.4GHz processor.
Sony recommends that for best performance also have to have an internet connection with download speeds and upload documents of at least 12 Mbps. You can check how fast you get here .
This is how the Remote Play is installed on your PC or Mac:

Step 1: Update your PS4


  • Go to Settings (Settings)
  • Select System Software Update (software update system)
  • Select Update (update), if available


  • Step 2: Turn on the PS4 Remote Play

    • Go to Settings (Settings)
    • Click Remote Play Connection Settings (connection settings Remote game)
    • Select the box next to Enable Remote Play (enable remote gaming)

    Step 3: Set the PS4 as your main system

    • Go to Settings (Settings)
    • Click on PlayStation Network / Account Management (PlayStation Network / account management)
    • Select Activate As Your Primary PS4 (PS4 enabled as your principal)
    • Click on Activate (activate)

    Step 4: change the settings of power of the PS4

    • Go to Settings (Settings)
    • Click Save Settings Power (energy saving settings)
    • Select Set Feature Available in Rest Mode (adjusts the available function in sleep mode)
    • Make sure the box that says "Stay Connected to the Internet" (stay connected to the Internet) is active
    • Make sure the box that says "Enable Turning on PS4 from Network" (allowing ignition of the PS4 from the network) is activated
    • Step 5: Install Remote Play on your PC or Mac

      • Click on this link to download the software Sony Remote Play on your PC or Mac
      • Follow the instructions to install the software

      Step 6: Time to play

      • Open Remote Play software on your computer
      • Click the Start button (start) software in Remote Play
      • Log into your account PlayStation
      • The software will then start searching the system. You should have no problem finding it and always when your PS4 is on (or in Rest mode or sleep mode) and connected to Internet
      • Connect your command DualShock 4 to your computer using a USB cord Micro-cable and start playing.

 
Back To Top
Distributed By Blogger Templates | Designed By OddThemes